Are you tired of experiencing audio sync issues while using your Roku device? Imagine sitting down to enjoy your favorite show or movie and Roku audio is out of sync. When audio doesn’t sync with the video on the Roku TV, the experience becomes horrible. You struggle to understand what is going on in movies and shows.
You definitely want to solve the Roku audio out of sync issue and you are at the right place. This post shows easy and quick fixes to fix the Roku audio sync issue with the video. After trying these solutions, your Roku TV audio won’t mismatch with the video, and you enjoy seamless entertainment. From simple adjustments and settings changes to advanced troubleshooting steps, I’ll guide you through each solution.
Understanding Roku Audio Sync Issues
Are you experiencing audio sync issues with your Roku TV? Don’t worry, you’re not alone. Audio sync problems can be frustrating, but with the right knowledge and troubleshooting techniques, you can fix them like a pro. Let’s see what causes audio sync issues on Roku.
- A Roku device or TV is used to stream online content. A good high-speed internet connection is required for it. A slow or unstable internet connection can lead to audio-video synchronization problems in the Roku TV.
- Sometimes Roku audio out of sync is only related to a specific streaming app. Audio with other apps works fine but not with a specific app. Bugs and glitches in the app cause audio synchronization issues in the Roku TV.
- The incorrect audio setting is a common cause of the Roku sounds being out of sync with the video.
- Damaged or low-quality HDMI cables and malfunctioning HDMI ports on your TV can disrupt the communication between your Roku and TV, leading to audio delay issues.
- Outdated firmware on your Roku device can sometimes lead to compatibility issues with streaming services, resulting in audio lag
Nord VPN – A secure and fast VPN provider (ON SALE)
Recommended By GeekyMR
“To access the blocked content of streaming platforms or see blocked sites with safety, you need a VPN. After testing different VPNs, we can say Nord VPN is a real value-for-money VPN. It hides your online identity and makes your data safe from hackers. Nord VPN has an exclusive deal for our readers with a great discount.“
Get 63% off
How To Fix Roku Audio Out of Sync?
1. Power Cycling Roku Device
Power cycling your Roku device is a simple solution for many issues of the Roku TV. When you power cycle the TV first it completely shuts down the device and then restarts it.
- Unplug the power cable from the back of your Roku.
- Disconnect the power source from the wall outlet or power strip.
- Wait for about 10-15 seconds to ensure that the device is completely powered off.
- Reconnect the power cable to the Roku.
- Plug the power source back into the wall outlet or power strip.
By power cycling your Roku, you give it a fresh start, allowing any temporary glitches or software hiccups to be resolved. The power cycle can remote any lag in the audio and synchronize it with the video.
2. Adjusting Volume Mode and External Speakers

When it comes to resolving audio sync issues with your Roku device, adjusting the volume mode and external speakers can often provide the solution you need. It is possible that someone has changed the audio setting of your Roku. There may be an issue with the external speakers of the Roku TV. Here are some expert tips to help you fix audio sync problems like a pro:
Check Audio Output Settings on Roku
- Navigate to the Roku home screen.
- Go to “Settings” by pressing the Home button on your remote and selecting the gear icon.
- Choose “Audio” from the list of options.
- Ensure that the audio output mode is set to the appropriate option based on your setup. Common options include:
- Auto (HDMI): This setting is suitable if you’re using HDMI for both video and audio, and your external speakers are connected to your TV.
- Auto (Dolby Digital): Choose this option if your audio system supports Dolby Digital decoding and you have a compatible setup.
- Stereo: Select this option if you are using external speakers that do not support surround sound or if you want a basic stereo output.
- Ensure that your external speakers or audio system are correctly connected to your TV or Roku device. Make sure that all cables are securely plugged in.
- Roku has different volume modes, including “Leveling,” “Night,” and “Off.” These modes can affect the audio output, especially when using external speakers. You can turn on every mode one by one to check the sound sync problem.
- Some external audio systems or soundbars allow you to adjust audio delay settings to synchronize audio signal with video. Check the user manual of your external speaker to find and adjust these settings.
3. Troubleshooting App-Specific Audio Sync Problems
Sometimes, the app may have a temporary glitch causing audio sync problems. Switch to another app and then after a few minutes switch back to the previous app. If you are lucky, this simple solution will work for you. If not then try this
Update the App
If you haven’t updated the app for a long time and there is an updated version of the app available, you should download and install the latest version.
To update an app on Roku:
- Navigate to the app on the Roku home screen.
- Press the ‘Options’ (*) button on your remote.
- Select ‘Check for updates.’
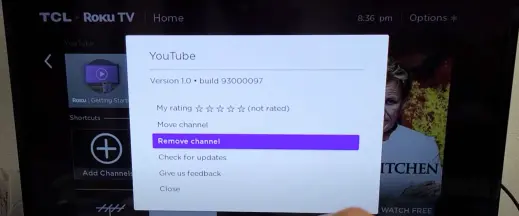
Reinstall the App
After updating the app, if the audio sync issue is not solved, consider uninstalling and reinstalling the app.
To reinstall the app:
- Highlight the app on the home screen.
- Press the ‘Options’ (*) button on your remote.
- Select ‘Remove channel.’
- Go to the Roku Channel Store.
- Search for and select the app.
- Choose ‘Add Channel’ to reinstall it.
Check for App-Specific Settings
Some apps have their own audio and video settings to enhance the streaming experience. However, these settings may affect synchronization. Look for settings within the app that relate to audio signal and video playback. If you find any setting, you should adjust it.
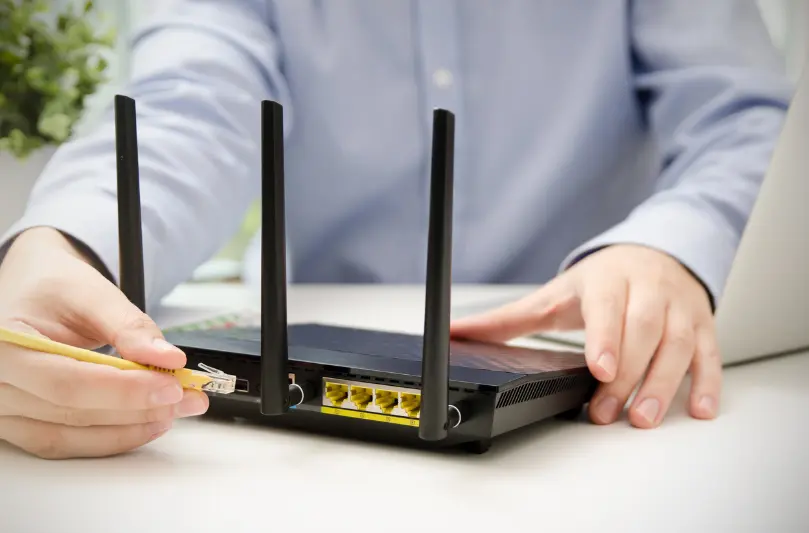
4. Troubleshooting HDMI Cable Issues
HDMI cables are essential for connecting your Roku to your TV and ensuring audio and video synchronization. If you’re experiencing audio sync issues on Roku, the HDMI cable may be a potential source of the problem.
Check the connections of the HDMI cables are tightened properly. If you find any loose connection, tighten it. Make sure the HDMI cable is fully inserted.
If you find any damage to the HDMI cable, you need to replace it.
Ensure that you’re using an HDMI cable that supports the necessary features for your setup. For example, if you’re trying to transmit 4K content, make sure you’re using an HDMI cable that supports 4K (HDMI 2.0 or higher).
Connect a different HDMI port (e.g., a Blu-ray player or game console) to the same HDMI input on your TV and external audio device. This will help determine if the issue is specific to the Roku TV or if it’s a general HDMI connection problem.
5. Checking Internet Connection
People watch Netflix, Amazon Prime, and other streaming platforms on Roku. These streaming platforms require a good internet speed. If the internet speed is slow or unstable, it will create issues with the audio and video synchronization. You will hear an audio delay on the Roku.
Check the Wi-Fi signal strength on your Roku device. Weak signals can lead to buffering issues and potentially cause audio sync problems in the Roku TV. If the Wi-Fi signal is low, you can use a Wi-Fi extender to improve the signal quality.
Sometimes, a simple router system restart can resolve temporary connection issues. Unplug your router from the power source, wait for about 30 seconds, and then plug it back in. Give it a few minutes to reconnect to the internet and then check if the audio sync issue persists.
If the Wi-Fi- keeps disconnecting from the Roku TV, try to connect the Roku TV directly to your router using an Ethernet cable. The speed of the internet is high in the wired connection and more stable.
Disconnect all other devices that are connected to the Wi-Fi. Multiple devices consume a significant amount of speed and you get low speed for the Roku device.
Regularly restart your router to clear the cache and refresh your network connection. Unplug the router, wait for about 30 seconds, and then plug it back in.
6. Updating Software on Roku
Software updates are essential for maintaining the optimal performance of your Roku device and resolving audio sync issues. By keeping your software up to date, you ensure that any bugs or glitches affecting the audio sync are addressed.
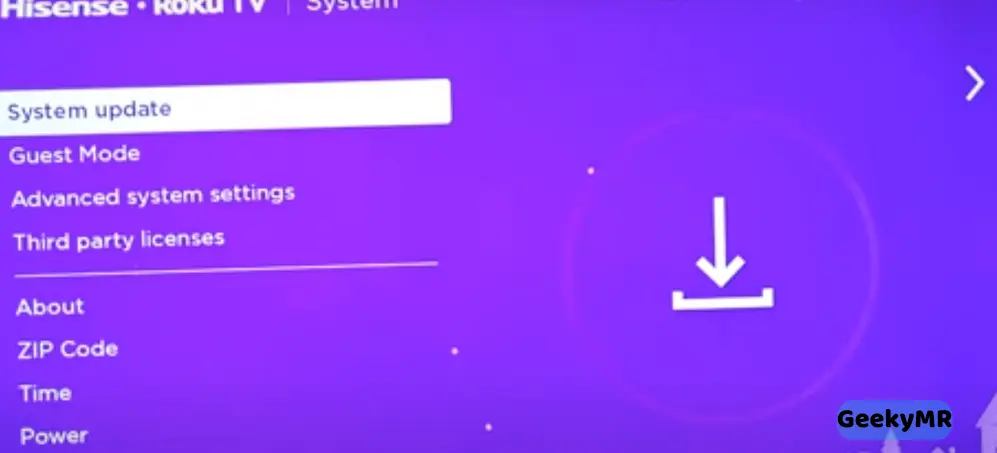
- Press the home button on your Roku remote to navigate to the home screen.
- Scroll up or down and select “Settings”.
- In the settings menu, choose “System”.
- Select “System update” and then click “Check now” to check for any available system updates.
- If the latest software version is available, choose “Yes” to download and install it. The process may take a few minutes, so be patient.
- Once the system update is installed, your Roku device will automatically restart.
It’s important to note that while software updates can often resolve Roku TV sound sync issues, they may also include other enhancements or fixes that can improve your overall Roku experience.
Read also – Veronica Movie Download In Hindi
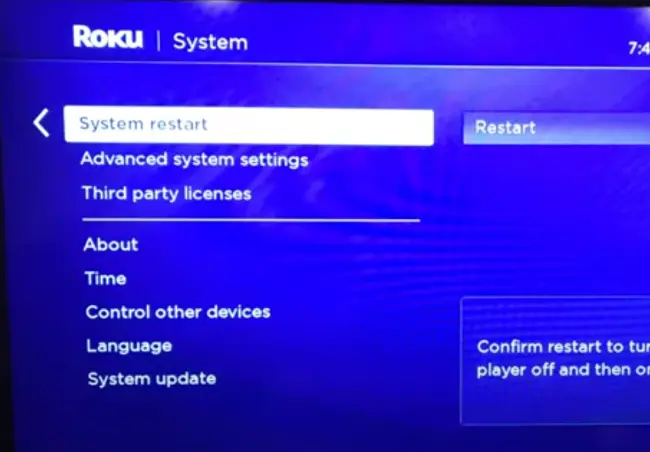
7. Performing a Factory Reset on Roku
A factory reset should be your last option. Sometimes, after trying all other fixes, the Roku TV audio sync issue doesn’t get solved. When you perform a factory reset, it will erase all data of the Roku TV and you get a fresh new Roku TV to set it for you.
After doing a factory reset, you will only see the default apps on the TV. You have to install all the other apps which you want to use. This process requires more effort but there is a high chance that it will solve the audio sync issue in the Roku device.
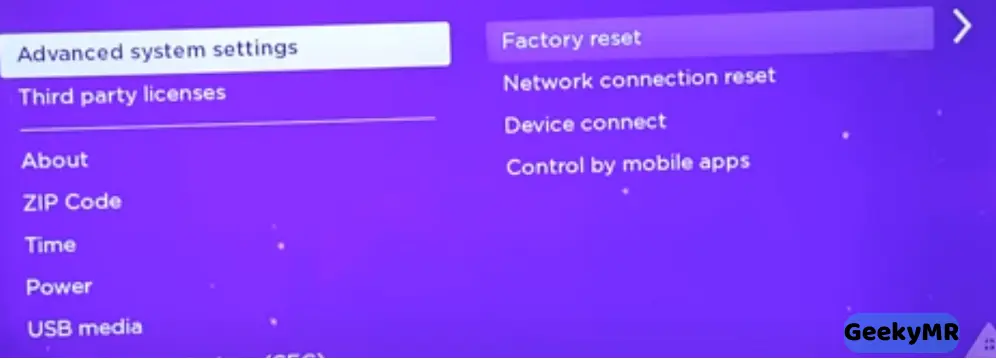
- Press the Home button on your Roku remote to navigate to the home screen.
- Scroll up or down and select the Settings option.
- In the Settings menu, scroll down and choose System.
- Select Advanced System Settings.
- Scroll down and select Factory Reset.
- You will see a warning message explaining that all settings and data will be erased. Confirm your decision by selecting Factory Reset again.
- Your Roku device will now initiate the factory reset process. It may take a few minutes to complete, so be patient.
- Once the reset is finished, your Roku device will restart and display the startup screen.
- Follow the on-screen prompts to set up your Roku again, just as you did when you first got it.
8. Contacting the Roku Support Team for Assistance

If you don’t want to factory reset your Roku TV, you can contact the Roku support team. If your TV is under the warranty, they will assist you and also send a repair person to repair your Roku TV.
They are experts in troubleshooting technical issues related to your Roku device. Roku offers a range of online support tools that can help you troubleshoot the issue independently before contacting the support team. These tools include automated diagnostic checks and step-by-step guides to resolve common audio sync issues.
If you still require further assistance after exploring the online resources, you can utilize the live chat or email support options provided by Roku. These channels allow you to communicate directly with a Roku support representative who can guide you through the troubleshooting process.
Conclusion
These troubleshooting tips will help you resolve your Roku audio out of sync issues with ease. By implementing these solutions, you can enjoy a seamless audio experience while streaming your favorite shows and movies on the Roku device. Ensure that your Roku device is running the latest software version. Check your HDMI cables and connections to ensure they are secure and undamaged. If the issue persists, try adjusting the audio settings on your Roku device. Experiment with different audio modes such as stereo, surround sound, or auto-detect, depending on your setup and preferences. Additionally, make sure your TV settings are properly configured for audio output.
FAQ
How Do I Adjust The Volume On my Roku Device?
To adjust the volume on your Roku device, first make sure that your Roku is connected to the same network as your TV. Then: Navigate to Settings > System > Audio & Video. Select the Output tab and choose your preferred audio output. To adjust the volume for individual channels, select the channel you want to adjust and click the Volume Up or Volume Down button.
Where Is Audio Leveling on Roku?
On Roku devices, audio leveling, also known as “Volume Mode,” can be found in the audio settings menu. To address audio sync issues, consider turning “Volume Mode” to “Off.” This ensures a more direct audio output without any automatic level adjustments, potentially resolving audio out-of-sync problems.
Why Is My Roku TV Audio So Bad?
Low-quality built-in speakers, insufficient audio settings adjustment, or problems with external audio devices are several reasons for the bad audio in the Roku TV.