
Have you recently noticed that the sound from your Hisense Roku TV suddenly went out? You’re not alone – it’s a common issue that many owners of these smart TVs have experienced. Hisense Roku TV No sound is annoying and you can’t hear your shows and movies. But don’t worry, with the right troubleshooting steps, you can get Hisense Roku TV audio working again in no time.
In this article, I’ll cover some of the most effective solutions to resolve a no audio issue on your Hisense Roku TV. We’ll look at simple resets that may fix a software glitch, check physical connections that may have come loose, and examine audio settings that could have been changed unexpectedly. Let’s dive into some potential fixes and have your Hisense Roku TV’s audio back up and running as soon as possible.
Nord VPN – A secure and fast VPN provider (ON SALE)
Recommended By GeekyMR
“To access the blocked content of streaming platforms or see blocked sites with safety, you need a VPN. After testing different VPNs, we can say Nord VPN is a real value-for-money VPN. It hides your online identity and makes your data safe from hackers. Nord VPN has an exclusive deal for our readers with a great discount.“
Get 63% off
Hisense Roku TV No Sound – Quick Fixes
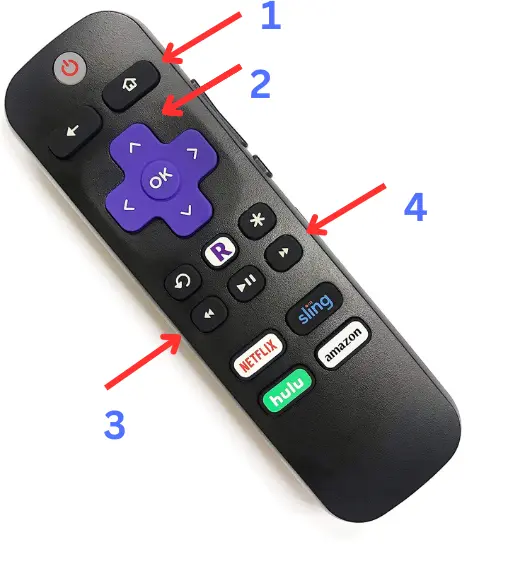
1. Clear Cache
One of the most effective and straightforward solutions to fix the “Hisense Roku TV no sound when turned on” issue is clearing the cache.
Over time, your Roku TV’s cache can accumulate unnecessary data and cause issues, including audio problems. Fortunately, Roku provides an easy way to clear the cache on your Hisense Roku TV.
- Use your Roku remote to go to the home screen of your Hisense Roku TV.
- To access the cache-clearing screen, you’ll need to input a specific sequence of buttons on your remote. Press the following buttons in order:
- Home (press it five times)
- Up Arrow (press it once)
- Rewind (press it twice)
- Fast Forward (press it twice)
- After entering this sequence, your Hisense Roku TV will automatically restart and its cache will be cleared. This process usually takes a minute or two to complete.
Clearing the cache essentially refreshes your TV’s system, often resolving sound-related issues. It’s important to note that this action won’t erase any of your settings or installed channels, so you have nothing to lose by trying it. After the restart, check if the audio is working correctly. If not, let’s move on to the next solution.
Read also – Why No Sound in Philips Roku TV?
2. Power Cycling Your TV
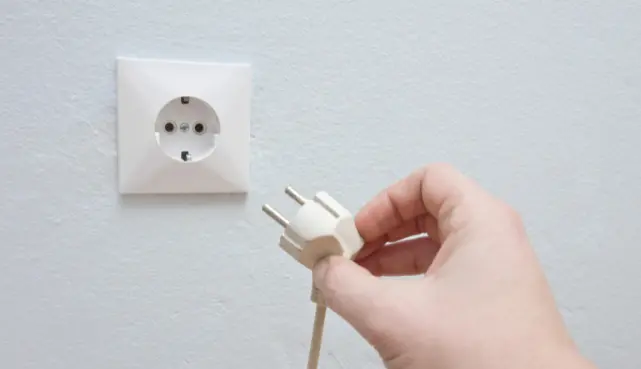
A power cycle can work wonders when dealing with various electronic devices, including your Hisense Roku TV. This process effectively clears the TV’s cache and refreshes its system. Here’s how to power cycle your Hisense Roku TV:
- Make sure your TV is powered on, and then turn it off using either your remote or the TV’s power button.
- After turning off the TV, unplug it directly from the power outlet. This step is essential to ensure a complete power cycle.
- Leave the TV unplugged for about 30 seconds. This pause allows any residual power in the TV’s capacitors to drain completely.
- After the 30-second wait, plug your TV back into the power source.
- Once your Hisense Roku TV is plugged in and connected to power, turn it on using the TV’s power button or your remote.
3. Adjusting Audio Output Mode
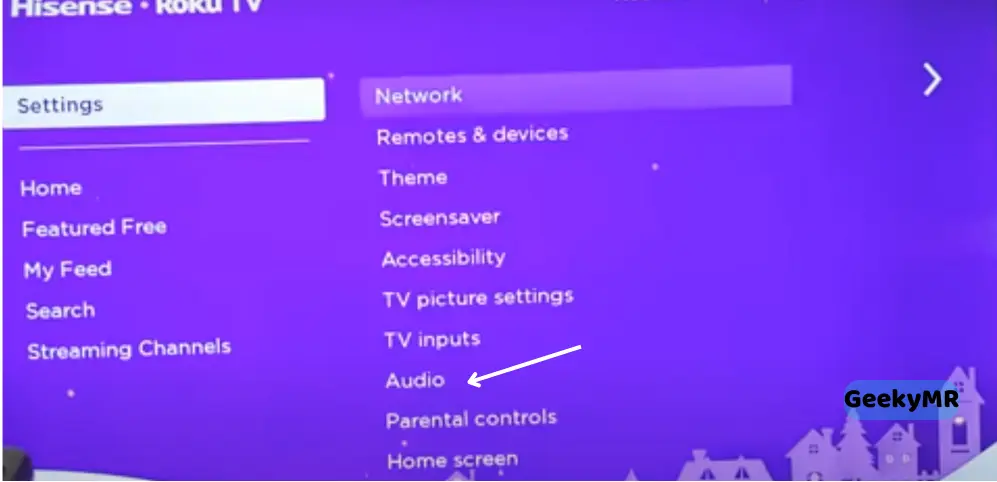
Sometimes, the audio output settings on your Hisense Roku TV can lead to volume problems. By default, Roku TVs are set to auto-detect the output mode, whether you’re using the TV’s internal speakers or an external soundbar.
However, this automatic detection may fail, resulting in sound issues. To manually adjust the audio output mode, follow these steps:
- Access the Roku Settings: Using your Roku remote, navigate to the Roku settings. You can do this by pressing the Home button, scrolling down to the settings option, and selecting it.
- Select “Audio”: Within the settings menu, look for the “Audio” option, and select it.
- Adjust the Audio Output Mode: Under the “Audio” settings, locate the “Audio Output” option. By default, it may be set to “Audio Detect.” Change this setting to “PCM-Stereo.”
- Test the Sound: After making this adjustment, test the volume on your TV to see if the issue is resolved. If the problem persists, you can also try switching to other available audio output options, such as “Auto passthrough.”
By manually configuring the audio output mode, you ensure that your TV is using the correct audio format, which can often resolve sound-related problems on Hisense Roku TVs.
4. Checking HDMI and Audio Cables
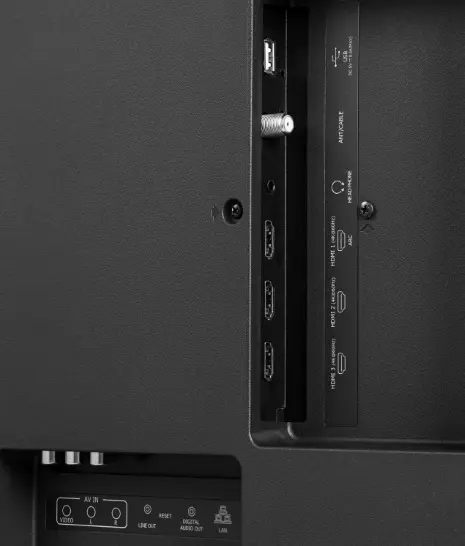
Sometimes, the “Hisense Roku TV no sound when turned on” issue can be caused by faulty or improperly connected HDMI and audio cables. If you’re using external devices like gaming consoles, Blu-ray players, or soundbars, it’s crucial to ensure that the cables are in good condition and correctly plugged in.
Begin by examining all HDMI and audio cables connected to your Hisense Roku TV. Look for any visible damage, such as damaged wires or loose connectors. If you find any issues, consider replacing the damaged cables with new ones.
Even if the cables appear fine, sometimes they can become slightly loose over time. Carefully unplug and then firmly re-seat all HDMI and audio cables on both your TV and the connected devices. Ensure they are securely connected to the correct ports.
After re-seating the cables, restart all the external devices you have connected to your Hisense Roku TV, such as your cable box, game console, or soundbar. This can help re-establish the HDMI and audio connections.
Ensure that your TV is set to the correct input source for the device you want to use. Use your Roku remote to cycle through the available inputs until you reach the one where your device is connected.
Play audio or video content from the connected device to check if the audio is now working correctly on your Hisense Roku TV.
5. Roku System Update
Outdated software can sometimes lead to issues on your Hisense Roku TV, including sound problems. Your Hisense Roku TV has a picture but no sound.
Roku regularly releases system updates to enhance performance and fix bugs. To ensure you’re running the latest software version, follow these steps:
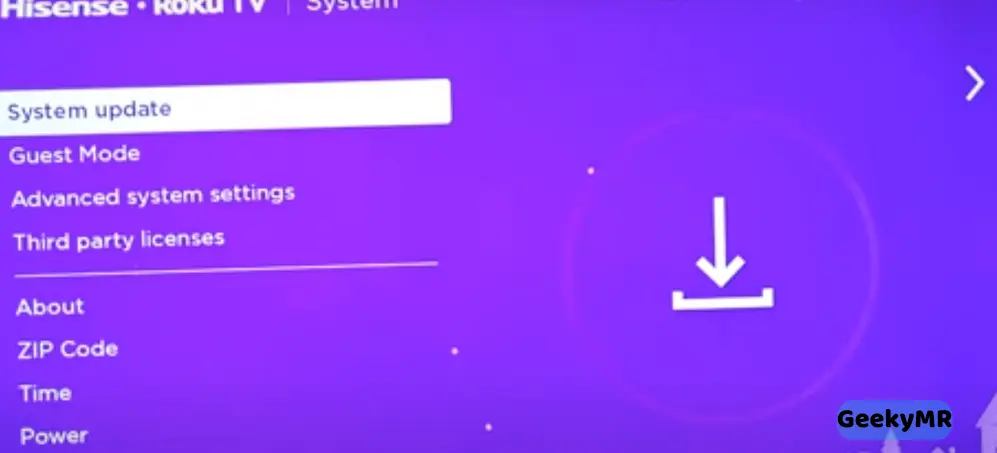
- Use your Roku remote to navigate to the home screen and select the “Settings” option.
- Within the settings menu, find and select the “System” option.
- In the “System” menu, you’ll find the “System Update” option. Choose it to check for available updates.
- Your Hisense Roku TV will automatically check for updates. If an update is available, download and install it.
- After the update is complete, it’s a good practice to restart your TV by turning it off and then back on. Once your TV is back on, test the sound to see if the issue is resolved.
6. Fix External Audio Device
If you’ve tried all the TV-specific solutions and still have no sound in Hisense Roku TV, consider using an external audio device, such as a soundbar or home theater system. Connecting external speakers can enhance your audio experience and bypass internal TV sound issues.
- Choose an external audio device that suits your preferences and budget. Soundbars are a popular and easy-to-install choice, while a home theater system offers a more immersive experience.
- Use HDMI, optical, or RCA cables to connect the audio device to your Hisense Roku TV. Follow the device’s user manual for specific connection instructions.
- Turn on the external audio device and ensure it’s set to the correct input source to receive audio from your TV.
- Access your TV’s audio settings through the on-screen menu. Select the audio output option and choose the external device as the audio output source.
- Play audio or video content on your TV to confirm that sound is now coming from the external audio device. Adjust the volume on both the TV and the external device as needed.
7. Reset Hisense Roku Audio Settings
Sometimes, no sound problems on your Hisense Roku TV can be caused by misconfigured audio settings, leading to issues like intermittent audio cutouts, audio going out of sync with the picture, or even a complete lack of sound. If you’re facing such problems, resetting your audio settings to the factory default can be a quick and effective solution.
Resetting the audio settings does not involve a complete system reset of your Roku device. Instead, it focuses solely on restoring audio-related configurations to their default values.
- Navigate to your Hisense Roku TV’s settings menu. You can usually find this option on your remote control or by pressing the “Home” button.
- Scroll down to “System” in the settings menu and select it.
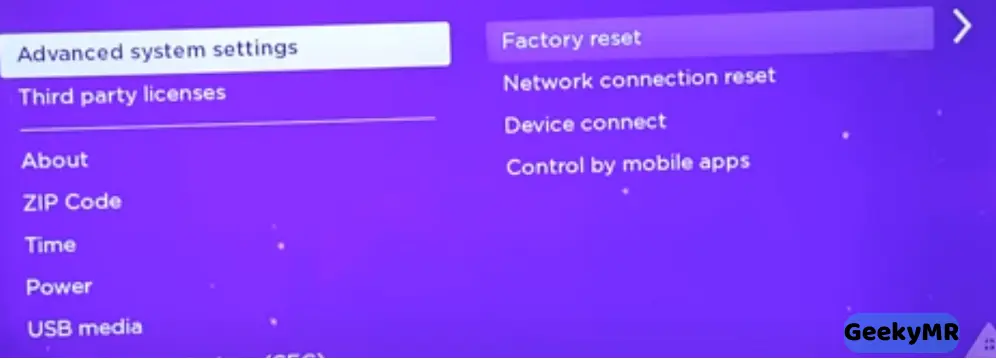
- Inside the “System” menu, you’ll find “Advanced System Settings.” Click on it to proceed.
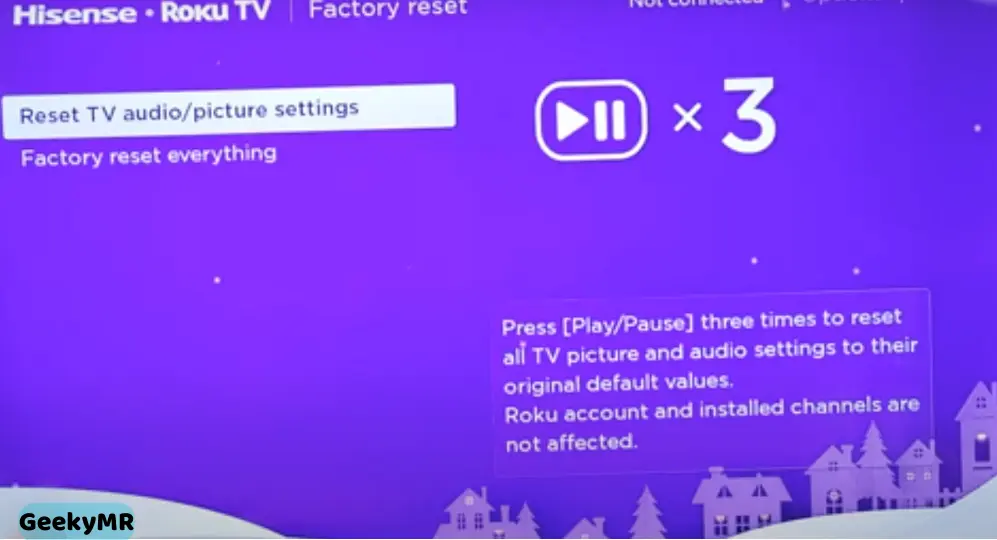
- Look for the “Factory Reset” option within the “Advanced System Settings” menu.
- Once you’re in the “Factory Reset” menu, choose “Reset TV audio/picture settings.” Confirm your selection.
- After confirming, you’ll likely receive a pop-up message confirming that all audio settings have been restored to their default values.
- To complete the process, press the “Play/Pause” button on your remote control three times. This action will trigger the reset of the Roku TV audio settings to their factory defaults.
8. Check for Interference

Interference from other electronic devices can sometimes disrupt your TV’s audio. This interference may result in a buzzing or humming sound.
If you suspect a nearby device is causing the interference, try moving it farther away from your TV. Alternatively, turn off the device temporarily to see if the audio issue improves.
Ensure that your TV and all connected devices are properly grounded. A lack of grounding can lead to audio interference.
9. Factory Reset Your Hisense Roku TV
A factory reset restores your TV to its original settings, erasing all installed apps and customizations. Before proceeding, make sure you have the login credentials for your Roku account, as you’ll need to set up your TV again. Here’s how to do it:
- Using your Roku remote, go to the home screen and select “Settings.”
- Within the settings menu, select “System.”
- In the “System” menu, choose “Advanced System Settings.”
- Scroll down and select “Factory Reset.” You’ll receive a warning about erasing all data and settings.
- Confirm that you want to proceed with the factory reset. Your TV will then begin the reset process, which may take a few minutes to complete.
- After the factory reset is done, you’ll need to go through the initial setup process, including connecting to Wi-Fi, signing in to your Roku account, and reconfiguring your preferences.
10. Contact Hisense Customer Support
If you’ve exhausted all the previous solutions and are still facing the “Hisense Roku TV no sound” issue, it’s time to reach out to Hisense’s customer support. They have trained professionals who can assist you in diagnosing and resolving the problem.
Look up Hisense’s official website or consult your TV’s user manual to find the customer support contact information.
Before contacting customer support, gather essential information about your TV, such as its model number, serial number, and any details about the issue you’re experiencing. The more information you provide, the easier it will be for them to assist you.
Conclusion
By identifying the root cause of the Hisense Roku TV no sound issue, you can fix the problem. It might be a simple cable connection, or setting misconfiguration, or anything else. This guide covers different solutions for every cause of audio issues in the Hisense Roku TV. By following these solutions you can get back clear sound in your Hisense Roku TV.
Related